
 In this tutorial, I am going to show how to use Photoshop styles to create depth and as a base for your paintings. Styles sort of get a bad rap because most designers and illustrators think of those glass buttons that the mac folks made so popular a few years ago. I remember every client was asking for “glass buttons” during that time and styles started to make me peevish too. But they do have their uses. Photoshop styles helped me whip out the name plate in last week’s tutorial without much fuss.
Here are the steps
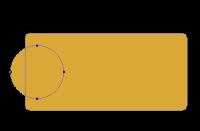
1. Select the rounded rectangle tool from the Photoshop tool palette and set the radius to about 10. Pick some sort of goldish color. Click and drag to make a square with rounded corners.
figure 1
 2. Next, we are going to create rounded circles jetting out from the square. Select the eclipse tool in the tool bar. We don’t need to create a separate shape here. It will be much easier to edit as one path. So to do this we will go to the top bar in photoshop and select the compound path option (figure 1)
figure 2
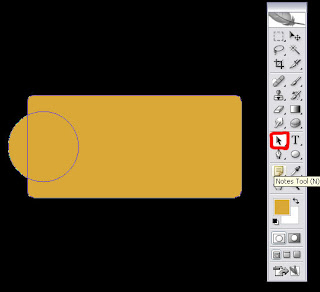
 3. Next, hold down the shift key and draw a circle to the left side of our square (figure 2). (holding the shift key constrains the proportions of the circle)
4. Now we obviously want both sides to have the same size circles so we will select the path selection tool (figure 3) and select the circle that we already drew.
figure 3
 Hold down first the alt key and then the shift and drag the left circle over to the right.
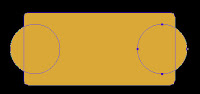 (The alt key makes a duplicate and the shift key makes sure that the second circle is aligned with the first). You will now have one fully editable shape. (figure 4)
 Hold down first the alt key and then the shift and drag the left circle over to the right.
figure 4
(The alt key makes a duplicate and the shift key makes sure that the second circle is aligned with the first). You will now have one fully editable shape. (figure 4)5. Now the fun part. We can apply styles to create the depth. Hit the small “f” key at the bottom of your layers palate or double click on the right side of the layer. This opens up the styles palate. Styles are something that you really need to play around with to get the most out of them but I used the following settings for the plate:
Check the following Layer Styles:
figure 5
 Drop Shadow:
Opacity 51, set to multiply, distance: 13 Size: 8
Bevel and Emboss: (see figure 5)
Satin: ( see figure 6)
Color Overlay :
Set to orange, Normal blend mode, 100%
figure 6

 If you want a rougher metal texture then you may want to play around with the pattern styles too.
And when you are done, in the styles palette, click the small right button and select “save styles” (right). Now you can use it again for creating more metal plates.
4 comments:
I love your work, I love these tutorials, and I really liked the other two blogs and will be getting your book to learn the real secrets of Anne Boyleen and all the other royal totties.
Thanks for the time you spend blogging. It makes my day.
Excellent tutorial, Thank you indeed!
Love your style.
Cata
Your place is valueble for me. Thanks!…
Forum.mwphglga.org
Information
Click Here
Visit Web
I discovered your blog site on google and check a few of your early posts. Continue to keep up the very good operate. I just additional up your RSS feed to my MSN News Reader. Seeking forward to reading more from you later on!…
Tinovi.com
Information
Click Here
Visit Web
Post a Comment