
Digital watercolors do allow you to experiment in a way that allows more freedom than traditional watercolor medium. (Those of you that have worked in watercolors know how unforgiving it can be.) The digital medium works the same as the traditional medium so I am not going to go into any watercolor techniques.
 First we start with a sketch. Watercolors are the only medium where I will start on a white piece of paper. I find this utterly terrifying because you cannot set a cool or warm mood with the color of your paper. But just like in traditional watercolor, the brightness of the paper becomes your base color.
There are two types of watercolor brushes in Painter. There are the regular old “watercolor brushes” that have been in Painter for ages and there are the “Digital Watercolor brushes”. The watercolor brushes are better for sweeping in washes of color in backgrounds, but you will need tons of memory to use these without grinding your machine to a halt.
 The digital watercolor brushes work much more efficiently. You can select one of the digital watercolor brushes from the brush menu by clicking on the small arrow next to the brush.
 Next you want to choose a kind of digital watercolor brush and customize it to your needs. I prefer to start with the “Wash Brush.” The real magic in this brush is controlling the “Wet Fringe” and “Diffusion.” In this sample, the left doodle has a Wet Fringe of 100% with a 0 Diffusion. You can see that this creates a brush strokes that goes on wetter because you can really see the color accumulating on the stroke edges. On the right the Diffusion is kept at 0 and the Wet Fringe is 0. This creates a smoother almost marker feel. To me, it looks more like what you can get out of Photoshop which I personally think looks more "digital."
 In this next example, the Wet Fringe is kept at 100% and the Diffusion is put at 20. This creates a very watery fluid brush which might not be the right brush for objects, but would look fabulous as a watery backgrounds.
Another interesting brush is the “Wet Eraser” under the same brush grouping. This brush allows you to easily correct your mistakes with literally a wet erase. Something that is difficult to do with traditional watercolors. (Note: the wet eraser only works on layers. Once you drop your layer down you will want to go back to the regular eraser.)

At this point, the painting just has some light washes. I like a little texture so I always go over my watercolor paintings with some pastels using different textured paper. And that is what you can see in the final.
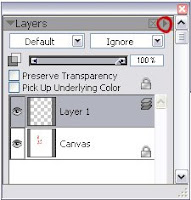 Another tip: Use lots of layers with watercolors. You can create a new layer in the same way that you do in photoshop by clicking on the small right triangle and selecting “new layer.” If you paint each wash on a seperate layer then you can lower the opacity as you go to and slowly build color. I drop the layer once I get it looking how I want it. (You drop the layer by clicking on the arrow to the right and selecting “Drop.” The drop is the equivalent to the "merge down" command in Photoshop)
I will cover Painter's pastel brush in another tutorial. I also plan to cover painting with a watercolor brush in Photoshop. The steps are a little less intuitive, but it can be done. Let me know if there is something in particular that you would be interested in seeing.
6 comments:
Thanks so much for the great Painter WC tips. The one thing you didn't cover, but maybe is included in the layering ..is how to blend the digital watercolors.
Painter's regular watercolors will blend but I am not able to find a good way to soften edges and blend one color into another. I am going to try separate layers and see if that combined with changes in opacity will give me the effect I want.
Hi Ginger,
In Painter X, you can change the Wet Fringe AFTER you have already applied a brush stroke too. But it must be on a seperate layer. (The Wet Fringe controls the softenss of the edges.)
And as far as blending goes, Painter has all the same blending modes as Photoshop with a few extras. (The default is gel mode for watercolors) But I find with watercolors it is best to just adjust the edges and the opacity as you go.
-Carlyn
Thanks for your comment!
I´ll read your explanations carefuly!
I will cover Painter's pastel brush in another tutorial. I also plan to cover painting with a watercolor brush in Photoshop. The steps are a little less intuitive, but it can be done. Let me know if there is something in particular that you would be interested in seeing. lawn suits online shopping , lawn suits online shopping
Painter's regular watercolors will blend but I am not able to find a good way to soften edges and blend one color into another. I am going to try separate layers and see if that combined with changes in opacity will give me the effect I want. mens gold chains germany , mens gold chains usa
An impressive share, I just given this onto a colleague who was doing a little analysis on this. And he in fact bought me breakfast because I found it for him.. smile. So let me reword that: Thnx for the treat! But yeah Thnkx for spending the time to discuss this, I feel strongly about it and love reading more on this topic. If possible, as you become expertise, would you mind updating your blog with more details? It is highly helpful for me. Big thumb up for this blog post!
Osport.lt
Information
Click Here
Visit Web
Post a Comment